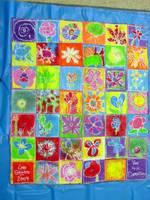
Second Grade Quilt: Students looked at the work of Georgia O'Keeffe, and made their quilt blocks using a flour based resist (as for First Grade)
Parent M. Laedtke constructed the quilt and it was donated to Meriter Hospital - Pediatric Unit.
update 9/15/08
Here is one recipe I tried for the flour resist mixture:
Mix together
1/2 cup flour
1/2 cup water
2 teaspoons of alum (somewhere I read that the alum used for papermaking is a better choice than the grocery store variety)
The recipe I ultimately used is from a book called
Art From Many Hands:
6 tablespoons flour
1 teaspoon alum
two cups cold water,
This should be cooked in the top of a double boiler. Stir while cooking until it becomes semitransparent and thickens somewhat. (This mixture, if I recall correctly, seems too thin while it is cooking, but thickens up quite a bit when cool. I even ended up mixing in a bit more water when the time came to bottle it up.)
The recipes can be doubled or tripled (because I had to make so much, I think I made even bigger batches than this, but didn't try to do it all at once).
Mix until there are no lumps. I recommend a blender! (I found that if I didn't use use my blender, the paste had tiny little lumps in it, and the squeeze bottles I used had tips small enough to be clogged by those tiny lumps. VERY frustrating.)
Use 100% bleached or unbleached muslin that has NOT been laundered (I usually wash out sizing before dyeing fabric, so I'm not so sure about this instruction) or treated with perma-press. Tape the muslin to a piece of corrugated cardboard. Put the paste in squeeze bottles, apply, and leave to dry overnight. (That sounds so simple until you multiply by enough squeeze bottles for an entire class and enough paste to refill them several times. I'm guessing I needed enough for about eighty or ninety students.)
I used textile paint for this project, as it needed to be permanent vibrant color. For a regular art project and the usual school budget, one could use paste food colors or watercolors or even tempera paint, though the flour would have to be picked or scraped off - no water immersion afterwards.
Apply the paint to the areas between the applied paste.
After the fabric is dry, chip or rub the paste off with fingers, trim and iron fabric, and mount. (A cautionary note: in an attempt to save time I heatset the pieces prior to removing the flour. I think the flour/alum + heat was a very bad combination, and a some pieces ended up with areas of weak fibers or little holes. However, it was a breeze to get the flour off after soaking in water, laying flat, and running a plastic scraper over them. I see that Dharma Trading now has a fixative that you can add to fabric paint so that it doesn't have to be heat set. Wish I'd had some of that then! Multicultural references could be the African adire eleko resist process which uses cassava or yam flour, or a Japanese dye process using a rice paste called Sarasa.
At The Matchbook blog, I found a great demo of the process with pictures (I see that the Getty Teacher Art Exchange she credits is my original post back when I was figuring out how this was going to happen!)

4 comments:
Can you tell me more about this project. I have never heard of flour based resist and what medium was used over the resist, what is the substrate> browpr@gmail.com QP
Hey Queen Pam,
I edited the entry with the recipe and instructions that I used and modified for the classroom. If you have any more questions, feel free to ask...
Thanks!
This sounds like some thing I want to try. Thanks for taking the time to share the process and recipe. The quilts are all beautiful. QP
Thanks Pam,
I think I'd like to try it again, too. At the time I didn't have any time to experiment for myself!
Post a Comment