Friday, February 24, 2006

International Night Table Decorations

Students are coloring the multicultural designs with Sharpie markers (a happy discovery was that the Sharpies did not dissolve the toner on the transparencies), gluing them with a glue stick onto the metallic paper, and then gluing tissue paper scraps to the back. I glued them back-to-back with a piece of cardstock to keep them stiff, and hotglued the skewer into the sandwich. Then hotglue the skewer into a paper-covered tube (3 juice can lids glued to the bottom keep it from rolling) with a model magic bead that has been pressed into a texture sheet and painted gold to keep it steady.


The first one is done. Nine more to go...

Another 60 Books Project Page

This was a really BIG book, maybe 15 inches tall. A bit intimidating because there was so much to fill. The other entries (3 others) were done on 8.5x11 paper and then glued into the book. Decided to paint this time...


I began with whatever acrylic paint that wasn't completely dried up in the jar... found a dark blue and purple lumiere and added a stainless steel color. After painting the whole page I stamped into the wet paint with a foam design stamp over the whole page. Unsure about what to do next, but sure that I wanted to get it done that afternoon since the book was already 4 days overdue and time is money...


After the paint dried, got out this new set of Souffle pens that are supposed to dry slightly embossed and opaque. I just decided to play around with symbols (thinking about Paul Klee, science fiction, runes, petroglyphs and heiroglyphs ...) and filled the whole page with mostly made-up symbols. Fun, even though the paper wasn't the sort that would make the pen marks 3D.

Monday, February 20, 2006

From the Archives: Peacock Painting


I can't remember if there was a book associated with this project, but I do remember that I brought in some peacock feathers and showed them lots of pictures. It might have been before or after a unit about Indian shadow puppets. I think this is grades one and two.
Marshmallows, regular and miniature, were used for the printing of the eyes of the feathers.

Painting the birds took one art session, and then the feather eyes and glitter the next week.
Posted by Picasa

Thursday, February 09, 2006

Paul Klee Inspired Planet Symbols

This lesson plan is from SchoolArts magazine. After learning about the art of Paul Klee (we used the Mike Venezia book) and talking about some of the important elements... use of color, symbols, abstractions... students made a mixed-media (black paint, oil pastels or watercolor) work using scientific planet symbols as an inspiration. After a review of color theory, students chose a monochromatic, analogous, or complementary (or a combination) color scheme.


Posted by Picasa

More Klee inspired abstracts & display


I put these up with a key to the planet symbols on a strip of paper on either side. I see lots of students passing by trying to figure which symbols are which in the artwork. Posted by Picasa

Wednesday, February 08, 2006

Handcarved Stamps for Center


These were all carved very quickly - an hour or so one night in preparation for the opening of a mini-printmaking center the next day at school. I had a bunch of dollar store erasers from long ago (I don't think they make them anymore) and they are a dream to carve. Nothing drawn in advance, though I did mark the center or divide the stamp into quarters with a pencil. Simple but great fun.


The 3 stamps in the background were used in the repeat patterns below. If you match up the edges, (I marked them for students with a permanent marker on the sides of the stamps), new designs emerge from the edges and at the corners of the prints from the positive and negative shapes in the stamps.

Posted by Picasa

Milk Filter Jellyfish


This is how the jellyfish begin... with a huge milk filter from Farm and Fleet. Lay it on the table, spray with water, and then students paint with liquid watercolors. (Most of the filter should be painted. If not, encourage artists to add more. Can also spray with water again and have students hold the filter up and tilt it so that the watercolor spreads)...


Carry it to another counter to add glitter paint (Sargent brand - a tinted transparent base with fine glitter. I add water to thin it some). Watch that young artists don't get carried away and mix all the colors...


Then to the drying rack. When painting and drying, there shouldn't be any paper underneath, which will drink up all the color on the filter. Sometimes I have the students take a monoprint with the paint that's underneath the filter, depending on how many are waiting their turns.
The next week, when the assembly takes place, I do a digital slide show and share a bit of info about jellyfish: no eyes - no brains - no bones - and etc. Posted by Picasa

Milk Filter Jellyfish II


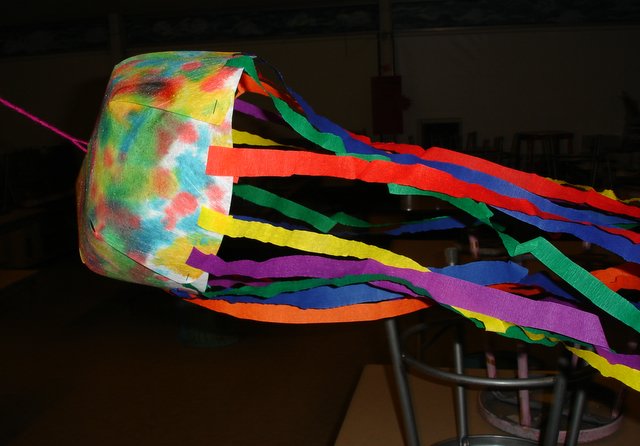
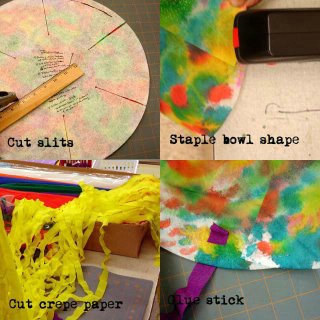
The final steps: (Warning! At this point jellyfish for the masses becomes labor intensive. I do this for 2 classes of about 23 K's. If you don't have lots of prep time or if you choose to do this for more classes you will want help!). Prior to class cut slits for stapling and tentacles 4 or so at a time using a template. Staple each circle into a bowl shape using an electric stapler. Refold crepe paper (the kind that is like yardage) so that it will fit in a paper cutter and cut strips. Unwind and cut several strips at a time into 3rds or 4ths. Before or during class pinch the center of the bowl and use a 1/8" hole punch for string handle. Thread a tapestry needle (long piece of yarn to do several at a time) and sew through the holes, cut off a length and tie. (Students older than 6 could do some of the above themselves.) Kinders will put a crepe paper strip through each slit at the edge of the bowl shape and glue the end down inside the jellyfish body.


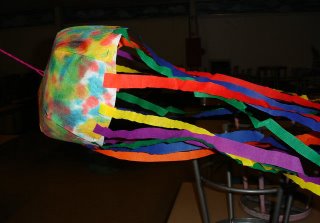
The milk filter jellyfish!
Before we start putting these together, I show a digital slide collection of jellyfish pictures and share the following facts:
***************
Jellyfish are not fish.
They do have a jellylike substance between two skins, an inner skin and an outer skin. Their bodies are a bell or umbrella shape.
They are about 95% water.
Jellyfish have no bones, no head, no brain, no heart, no eyes or ears.
They do have a nervous system. They breathe through their skin. They can react to light and smell and touch. They have a mouth, and tentacles that have poisonous cells. The poison helps them to capture prey.
Jellyfish have been around for more than 650 million years. They are found in almost all the oceans of the world.
They are invertebrates (no backbone) and are related to sea anemones and coral (creatures that sting and have a mouth in the center of their bodies surrounded by tentacles)
Jellyfish drift with the currents, but they do have a ring of muscles that contract to expel water from the umbrella-like body, and that will move them up or down in the water.
Some jellyfish are harmful to humans, but not all of them.
There are animals that eat jellyfish, like sea turtles. Some people also like to eat jellyfish.
Jellyfish range in size from about 1 inch to 7 feet. The tentacles can be up to 120 feet long.
******************
Posted by Picasa

Sunday, February 05, 2006

Picture Book Inspiration

Some of my favorite lessons began with a picture book, especially for the younger grade levels, K-3.


Kindergarten/First grade gadget prints & collage


Kindergarten resist painting and drawing.


What a great story to read out loud! The boots were made by cutting out templates of an assortment of fancy footwear, adding design elements and patterns with sharpie and crayon, and a watercolor resist. The backgrounds are drawn in sharpie markers and colored with chalk. These are third grade artworks.


Kindergarten explores color mixing and mouse-making.

Glue & Chalk Tropical Fish


These are 2nd and 3rd grade tropical fish (observational drawing from photographs) that were drawn first on black (18x24 paper), then the lines were traced in white glue. The blended colors are done in chalk.

Cityscapes


Third grade cityscape tempera paintings. Spent some time talking about foreground, middleground, and background and how to add details over dry areas. These were 18x24 size paintings.

Drawing Trees


A multi-layered lesson, drawing from observation studies, the "Y"s of branches, negative space (the tree trunks are the paper color), and cool and warm colors. 2nd and 3rd grade.