Showing posts with label fiber arts. Show all posts

Tuesday, October 06, 2009

Chenille Love

I warped up enough for two scarves ... this is the second in progress, with a substitution of the black for the dark blue in the weft. I was a little worried that the pattern would not show up at all after wetfinishing. In the end, the patterning is subtle, but still noticeable in both scarves. The pattern is an extended point shadow weave (not that I really understand what that means, exactly) from A Weaver's Book of 8-Shaft Patterns. Sett at 20 epi (elongated the pattern into a long diamond).
Scarf #1 after wetfinishing.
Scarves #1 and #2. The black weft greyed out the color... most noted when side by side or when examining the fringe.
And speaking of fringe. I'm not sure what I did wrong, because I twisted fringe exactly the same way with a previous scarf. It could be because I didn't hem stitch the start and finish or that the fringe was a couple of inches longer. I pulled out the worming, but I'm sure it will do the same thing again when washed again. Since I put Fray Check on the knots, I'm not even sure I can retwist them.

Sunday, July 19, 2009

The 2009 Smithsonian Craft Show

Just a very few of the very amazing wearable art pieces shown at the Smithsonian Craft Show in 2009. From the fact sheet: "The Smithsonian Craft Show features 120 superb craft artists, each one reflecting the story of contemporary American craft in one of 12 categories: basketry, ceramics, decorative fiber, furniture, glass, jewelry, leather, metal, mixed media, jewelry, wearable art and wood. The individual artists or partnerships, including 44 first-time participants, are selected by a panel of 3 jurors, a new set each year, from over 1,300 applicants."


Turquoise Jacket/Scarf (handwoven complex twill in silk, merino wool, and rayon jacket, and handwoven and felted scarf in merino wool) and Blue Cool Squares (handwoven and felted merino wool jacket, handwoven silk and wool collapse weave scarf) -
by Patricia Palson, Contoocook, New Hampshire.


Detail: Firefall Euro Jacket - needlefelted merino wool
by Candiss Cole, Sedona Arizona.


These whimsical, organic, handfelted hats are by
Lauri Chambers, Nordland, Washington.

Friday, May 22, 2009

The Louet David Loom

It seemed serendipitous that I was musing about how a lot of the weaving drafts I was looking at in books required at least 8 shafts, (and I, alas, had only four) at the same time that I wandered into the basement of Lakeside Fibers during a spring sale. The store's owner(s) had decided to divest themselves of all weaving equipment and supplies and their demo looms were for sale. 
Kismet, right?
And so, the Louet David, in cherry, an 8-shaft, 10 treadle sinking-shed loom, joined the Harrisville in the sunroom. V-e-r-y tight quarters, but I made them fit, I think. Sort of.


The Harrisville Loom


Up into the light at last, with a warp that was meant to be a baby blanket for the child now graduated from college. I had to buy a new handle for the beams, and make a new bar for connecting the warp beam to the castle, but that was about it ...
This is a four shaft Harrisville Designs loom that I built from a kit. It has four treadles with direct tie-up, but if I ever felt the need I can evidently buy a conversion to make it six treadles.


I replaced many, many broken warp threads, but felt I owed it to the weaving gods to try to finish it.


Tied onto the the warp beam, but the replacement of so many threads caused this waterfall of tangled warp when finally ready. I cut off the last six inches or so... I didn't have enough weft for weaving the whole length anyway.


Started weaving and finished within two days. It's a waffle weave, though the waffle-ly part would be deeper with more shafts. The baby seemed pleased with it, though...


Thursday, March 05, 2009

Crazy Quilts and the Contemporary Crafter


I saved this article by Gayle Worland from the Sunday paper on March 1, because there were a few things that really resonated with me in the interview with Beverly Gordon (professor of textiles and apparel design at UW-Madison and the curator of this exhibit, "A Fairyland of Fabrics: The Victorian Crazy Quilt" )

She compares the craft of these women to present day scrapbooking (and that segues into other paper and fabric crafts), citing an emphasis on creativity, invention, and play, and the importance of "abundance" and "collecting" of material as part of what fuels the craft(s). There's also the intriguing aspect of collective motifs - themes or subjects that appeal to many of us who do the same kind of art and craft that are reflective of our time and cultures and interests.

I quite like this quote the article ends with:

"There's a sense that there's infinite possibilities with materials and making beautiful things ... It's about making something with little bits, the fascination of combinations, because essentially they are a collage."

Saturday, September 04, 2004

Kindergarten Quilt


Kindergarten Quilt: Kinders were learning about the ocean in their classrooms; they drew their ocean fish and creatures with black fabric marker, colored them with fabric dye sticks, and painted the backgrounds with thinned textile paint. Parents L. Binkley and M. Hanson constructed the quilt and it was donated for display to St. Mary's Hospital - Pediatric Unit.

Second Grade Quilt


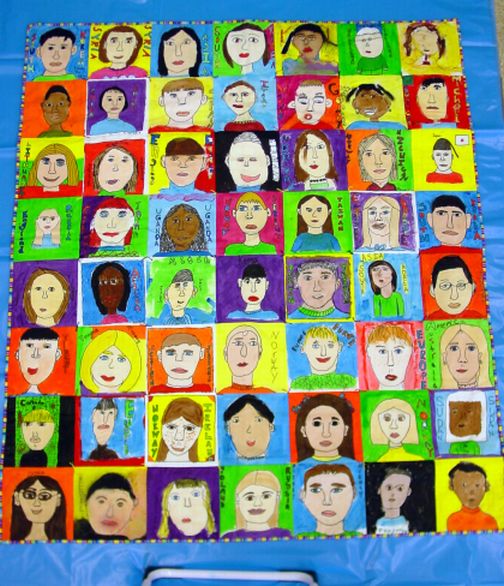
Second Grade Quilt: Students looked at the work of Georgia O'Keeffe, and made their quilt blocks using a flour based resist (as for First Grade)
Parent M. Laedtke constructed the quilt and it was donated to Meriter Hospital - Pediatric Unit.

update 9/15/08

Here is one recipe I tried for the flour resist mixture:

Mix together
1/2 cup flour
1/2 cup water
2 teaspoons of alum
(somewhere I read that the alum used for papermaking is a better choice than the grocery store variety)

The recipe I ultimately used is from a book called
Art From Many Hands:

6 tablespoons flour
1 teaspoon alum
two cups cold water
,
This should be cooked in the top of a double boiler. Stir while cooking until it becomes semitransparent and thickens somewhat. (This mixture, if I recall correctly, seems too thin while it is cooking, but thickens up quite a bit when cool. I even ended up mixing in a bit more water when the time came to bottle it up.)

The recipes can be doubled or tripled (because I had to make so much, I think I made even bigger batches than this, but didn't try to do it all at once).

Mix until there are no lumps. I recommend a blender! (I found that if I didn't use use my blender, the paste had tiny little lumps in it, and the squeeze bottles I used had tips small enough to be clogged by those tiny lumps. VERY frustrating.)

Use 100% bleached or unbleached muslin that has NOT been laundered (I usually wash out sizing before dyeing fabric, so I'm not so sure about this instruction) or treated with perma-press. Tape the muslin to a piece of corrugated cardboard. Put the paste in squeeze bottles, apply, and leave to dry overnight. (That sounds so simple until you multiply by enough squeeze bottles for an entire class and enough paste to refill them several times. I'm guessing I needed enough for about eighty or ninety students.)
I used textile paint for this project, as it needed to be permanent vibrant color. For a regular art project and the usual school budget, one could use paste food colors or watercolors or even tempera paint, though the flour would have to be picked or scraped off - no water immersion afterwards.
Apply the paint to the areas between the applied paste.
After the fabric is dry, chip or rub the paste off with fingers, trim and iron fabric, and mount.
(A cautionary note: in an attempt to save time I heatset the pieces prior to removing the flour. I think the flour/alum + heat was a very bad combination, and a some pieces ended up with areas of weak fibers or little holes. However, it was a breeze to get the flour off after soaking in water, laying flat, and running a plastic scraper over them. I see that Dharma Trading now has a fixative that you can add to fabric paint so that it doesn't have to be heat set. Wish I'd had some of that then! Multicultural references could be the African adire eleko resist process which uses cassava or yam flour, or a Japanese dye process using a rice paste called Sarasa.
At The Matchbook blog, I found a great demo of the process with pictures (I see that the Getty Teacher Art Exchange she credits is my original post back when I was figuring out how this was going to happen!)

First Grade Quilt


First Grade Quilt: Students were studying artists in their classrooms, in art we looked at Jim Dine heart paintings, prints, and sculpture. Used flour resist paste in squeeze bottles in first session, and second class period painted with textile paint. I removed the paste and heat set the blocks.
Parents L. Hogan and S. Gates-Hendrix constructed the quilt and it was donated to Madison Community Health Center.

Third Grade Quilt


Third Grade Quilt: Students had been studying city planning/Box City in their classrooms, and their blocks reflect a favorite place, real or imagined. Quilt blocks were made using fabric markers and/or fabric dye sticks. The quilt was constructed by parents L. Binkley and B. Muschitz and was donated to the Boys and Girls Club.

Fourth/Fifth Grade Quilt II


Fourth/Fifth Grade Quilts: These students did self-portraits using fabric markers and textile paint. Those who wished included a country of origin the the background in keeping with the school-wide theme "Everybody Comes from Someplace: A Patchwork of People".

Fourth/Fifth Grade Quilt I


A collaborative quilt project by the entire student body, with the invaluable assistance and advice of a core group of parents. This is the first of two fourth and fifth grade Self Portrait quilts. These two quilts were constructed by parents B. Muschitz, K. Judge, D. Kaufman, and B. Ohm and were donated to UW Madison Children's Hospital and Clinics and Madison Public Library - Sequoya Branch.