Wednesday, November 16, 2011
Friday, October 21, 2011
B Yourself
Set the Black Cat to the task of doing the cutting on multiples of a Paula Best rubber stamp, the "B Yourself Mannequin". I scanned a print of the stamp at 100% and traced the outer edge, cut multiples in cardstock, and then hand stamped using a stamp positioner. It was a little off in places, requiring a tiny bit of trimming, but not much.
There's probably a better way to do this, but I haven't investigated yet.
It's hard to see in the pictures, but I cut three images for each tag to paper-piece
them together: basically the bottom is the whole stamp, the middle is the
mannequin minus stand and wings, and the top is the head and rabbit.
So that's a lot of mannequin that I didn't have to cut out by hand.
That is an excellent thing.
That is an excellent thing.

I tweaked a basic tag shape in the MTC program, and cut tags from Donna Estabrooks'
"the Colorful Life" 8x8 cardstock pack, and then cut a shadow layer in black.
On some of the tags, I used the
Tim Holtz Pickett Fence Distress Stain to tone the colors down.
Tim Holtz Pickett Fence Distress Stain to tone the colors down.

The "B Yourself" figures were partially colored first with various Distress Stain
colors and then over-colored with Copic markers. Some of them got a final distressing
with the Picket Fence stain. Added ribbon and a little key charm to finish.
These three also got a "believe" stamp, embossed in white detail EP.

I also used the cutter to design and cut an envelope for the tags, which were then embossed with the cuttlebug and finished with a tiny 3D letter "B" sticker. Some of the mannequins got brown faces, for all of us Mocha Divas (saw that on the TLo blog commentary recently, and it tickled me), and the rest are bit more fantasy face.

Wednesday, October 12, 2011


Rock, Paper, Vinyl
In a previous post, I mentioned using the new digital cutter to make new labels
for the card catalog that holds a lot of my crafting supplies and rubber stamps.
And I rather blithely mentioned that paper didn't work so well.
May I present Exhibit A: Paper Not Working So Well

Then I remembered the little sample of cut vinyl that came with the cutter as a test cut.
I'd never cut vinyl on the Craft Robo, so it hadn't occurred to me until now to use it.

So I dug out a roll of vinyl that I'd bought a long time ago and never used, and it worked really well. The experiments I'd tried with transferring and gluing paper were marginal at best, and the vinyl has an adhesive on the back already. "Weeded" (vinyl sign talk for getting rid of the little bits inside the shape with an x-acto or other tool) it and lifted the letters off the backing with transfer tape . . .

and then transferred it from there to a piece of transparency paper.
That was rather fun.
A lot more fun than scraping tiny letters off a mat.

Thursday, September 15, 2011
The Day We Changed Our Lives Forever

Cut paper and hand sewn tunnel books by Andrea Dezsö with interactive LED lights.
" ... tiny red, green and blue LED lights that correspond to three sliding knobs on the wall. Shifting the balance of light from blue to green changes the energies and intentions of conversing devils, whispering rabbits, dancing pixies, perching grasshoppers; the creatures live in aÊtenuous balance between cute and sinister according to the behaviors of red, green and blue. Here, the narratives are open-ended; we create the story as we the turn the knob."
Chloe Hawkins: Zero to Superhero, NY Arts Magazine
Sunday, September 04, 2011
Sunday, August 14, 2011
Black Cat Cougar Digital Cutter
I have a little obsession with digital diecut machines. Not that big, I guess ... as I am reading recently in various forums about people that have several, and prior to this week, I just had the one itty-bitty one. Now I have a bigger one that will cut 13 inches wide rather than 8 inches) and can cut through a variety of thicker materials that the bitty one couldn't - a Black Cat Cougar "Cub".

Here's the Cougar with my cute little first generation Craft Robo.

Project Two is cutting labels for the drawers of the card catalog. Needed to be done, and I thought cut labels on a clear background would look more interesting visually than just printed ones. Kind of a "because I can" moment. I'm using an Arts and Crafts style font, Chelsea Studio.
After experimenting with paper, I discovered vinyl. How could I have not known about vinyl before now?! After cutting the labels in vinyl, it was easy to transfer that to a transparency and then trim the transparency to fit the drawer front.
Friday, August 12, 2011
Exploding the Codex: Theatre of the Book
EXPLODING THE CODEX from Douglas Sandberg on Vimeo.
Through Felt and Wire, a film and photographs by Douglas Sandberg Photography featuring artist's books from the collection of Mary Austin in a show entitled "Exploding the Codex: Theatre of the Book". I especially like "Inside Chance", a book using a form I've seen in several children's toys ... as it is a kinetic piece it's best to see it in the film, at about minute 3.
French Toast


This little gravy boat was part of my wedding china. We don't have gravy too often, but we use this all the time for maple syrup.
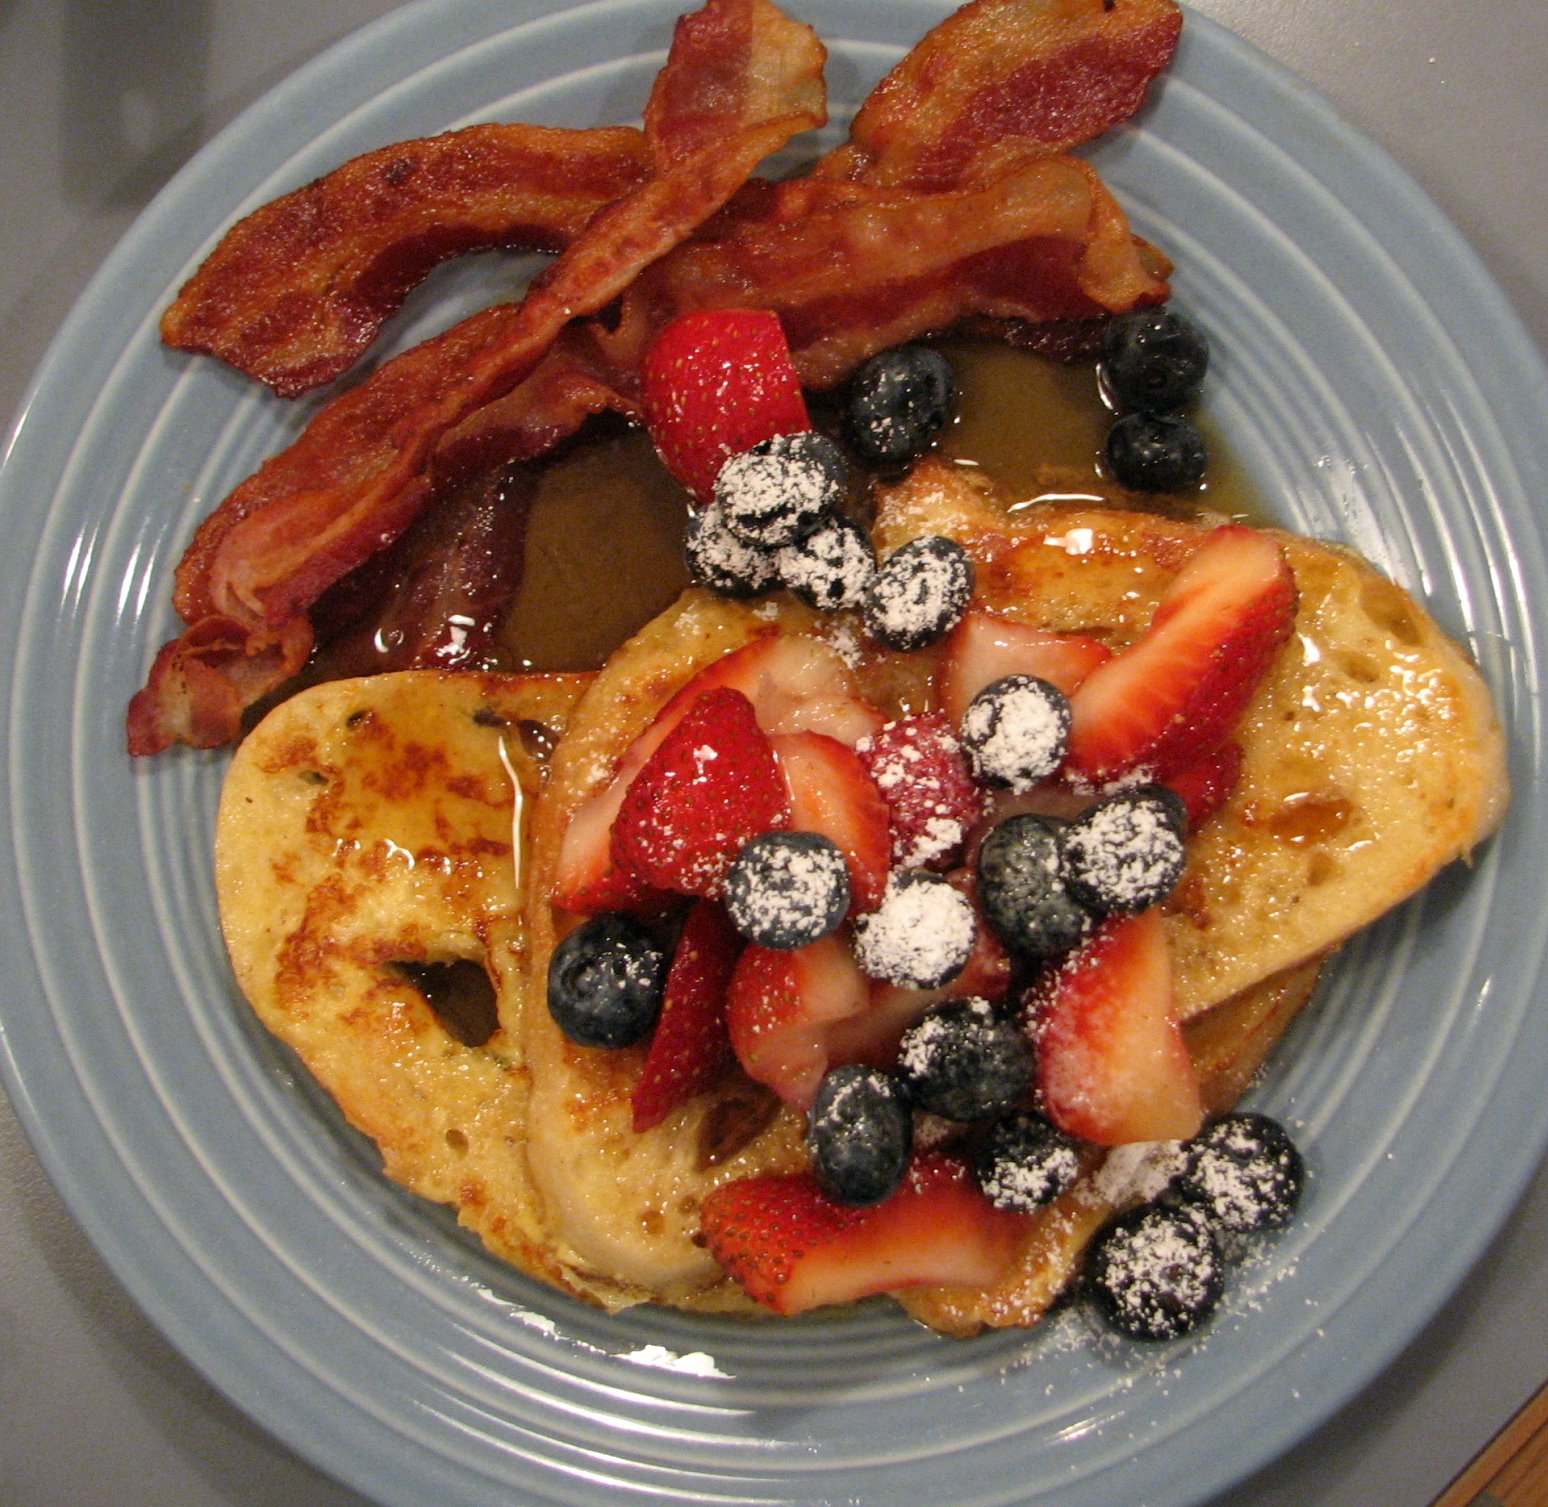
Back then I used honey in the egg mixture. This time around I used vanilla and cinnamon.
Bacon, strawberries, blueberries, and of course, maple syrup, round everything out nicely.
And it comes out here ...

Another beautiful day for the Summer Band Jam in the park.
I love the way the trees are reflected at the top of this instrument.
Friday, July 15, 2011
James Koetting - Postal Workers Canceling Stamps
I heard this awhile back on a Hearing Voices podcast from NPR - a recording of postal employees in Ghana canceling stamps.
Friday, July 01, 2011
3D Printing
 | |
|
3D printing is just such science-fictional magic ... I think this must be the beginnings of the Star Trek Star Trek replicator. Cunicode (via BoingBoing) company designed 30 coffee cups in 30 days using 3D printing technology. Basically, if I'm understanding this right, layers of binder in a container of ceramic dust were built up one by one to form the object which is then dried, the excess ceramic dust removed, then fired and glazed.
The first 3D printer work I saw was from an Etsy jeweler, nervous system.
 |
| nervous system vessel pendant - white nylon and sterling silver |
Their beautiful organically-inspired jewelry is made from different plastics and metals
(and with some different processes as well, not just 3D printing.)
Here's their blog: nervous system which has more details about the beginnings, the process, and the inspirations for their lovely art-to-wear.
Friday, April 08, 2011
3D Architecture Dutch Stamps
Postage stamps for philatelically and technology inclined architecture lovers.
Saturday, April 02, 2011
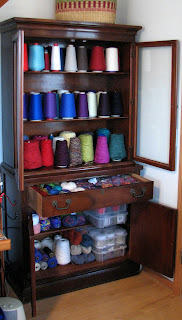
A New Home for Yarn
First offload all of the yarn from the super cheap bookcase and put it on the treadmill
(which often does double-duty as a storage unit. More often than it's used for walking, in fact).


(which often does double-duty as a storage unit. More often than it's used for walking, in fact).

Then bring in the china cabinet from the garage where we put it after rescuing it at long last from the storage unit. Its first home that I know about was my grandmother's living room in San Antonio. (I don't really remember what she had in it specifically, but it was used in the traditional way. I do remember what was in my grandmother Nina's china cabinet, because my favorite thing to do at her house when I was a child was to take out the little china figures and animals she kept there . . . I remember some little china dogs and perhaps a shepherdess, women in kimono with fans, I think, and some others . . . and have some imaginative play time with them. I don't think I ever broke any, amazingly enough. She also kept peppermint sticks in there.)

Transfer all of the yarn to its new home!
(OK, well . . . almost all the yarn. There is still some on a couple of shelves in the laundry room.)


Rest on laurels.
Beads should be a controlled substance . . .
Really.

These are tiny 11/0 cylinder beads. (And my purely selective OCD tendencies are making an appearance, but I am telling myself I labeled the colors for the benefit of party guests.) These are Toho Treasure Beads found in my local craft store, definitely several notches above the generally available craft seed bead variety pictured below, and quite a bit spendier! Evidently it's the cylinder type beads that you need for more precise bead weaving - or is it loom beading? They have a more consistent shape and size and larger holes for multiple passes of the needle and thread. I've learned a lot about loom beading rather after the fact. The party is over, and it's a day or two later that I learn some very useful techniques for such things as warping, changing the weft threads, preferred size of needles, finishing, etc. The books I have in my stash all have a few pages about loom beading, but I learned the most from a dedicated book that I got from the library, Contemporary Loom Beading: An New Look at a Traditional Stitch. And the best site I found for online instruction of various beading techniques is at Fusion Beads.


These are tiny 11/0 cylinder beads. (And my purely selective OCD tendencies are making an appearance, but I am telling myself I labeled the colors for the benefit of party guests.) These are Toho Treasure Beads found in my local craft store, definitely several notches above the generally available craft seed bead variety pictured below, and quite a bit spendier! Evidently it's the cylinder type beads that you need for more precise bead weaving - or is it loom beading? They have a more consistent shape and size and larger holes for multiple passes of the needle and thread. I've learned a lot about loom beading rather after the fact. The party is over, and it's a day or two later that I learn some very useful techniques for such things as warping, changing the weft threads, preferred size of needles, finishing, etc. The books I have in my stash all have a few pages about loom beading, but I learned the most from a dedicated book that I got from the library, Contemporary Loom Beading: An New Look at a Traditional Stitch. And the best site I found for online instruction of various beading techniques is at Fusion Beads.

Sixteen Candles

Another birthday, another crafting party!
This time we did loom beading and made some bracelets.

I printed out a template graph and the guests made up their designs and got started. I helped with warping and attempted to demonstrate threading a beading needle with an assist from a needle threader, but the thread was too thick and the needles too thin and the threader too flimsy . . . eventually I broke every one of them with nary a needle threaded. The youngers had no issues with threading, though, and were able to do it without the "assist".


A couple of the girls completed their bracelets before night's end and I added a ribbon crimp end and a toggle clasp for them. The others took their looms home to finish up.
Thursday, March 10, 2011
New Yorker Cover - iPhone Brushes App
A couple of videos - the first one showing the cover drawing in progress by artist Jorge Colombo (from the New Yorker blog). I love that the artist extols the importance of the "undo" function! And the second video is an interview with the artist via ABC.
David Hockney's Fresh Flowers
 |
| via NPR |
A few things that I liked or wondered about:
1. When Mr. Hockney first began making these little works of art, he emailed them to about two dozen friends in the morning after they were finished. (Imagine being on the email shortlist of David Hockney? And what happens after you get one of these digital paintings . . . should you save it forever? Wouldn't you feel just awful if you accidentally or on purpose deleted it?)
 |
| via NPR |
2. The paintings were made with various painting/drawing apps for the iPhone/iPad, including an app called Brushes. Here's a look at what other artists at the Brushes site and at a Brushes exhibit of art in Austin, Texas, which opened on March 10, are doing with the app.
3. Hockney would get so into the "painting" process on the iPad that he would sometimes wipe his fingers on his clothing, as if cleaning the paint off. He prefers using his fingers to using a stylus for different effects, and sometimes will use the fingers from his non-dominant hand.
4. The 20 iPods and 20 iPads in the exhibit were on 24 hours a day, and occasionally Hockney would email a new painting to one of the devices, swapping out images.
5. . A quote from this article on the BBC site (which includes a video of Hockney talking about the show) -
"Drawing is rather like playing chess:
your mind races ahead of the moves that you eventually make."
6. There's a companion app that creates a video as you're using the Brushes app, and that's how these videos of drawings from start to finish were created. Portrait videos by artist Olechka are here, and a New Yorker magazine cover here. This cover was drawn in May of 2009 by Jorge Colombo while standing outside Madam Toussaud's Wax Museum in Times Square. (I'm sure we passed by this very spot, or close to it, when we were in NYC in the summer of 2009. We could see the Madame Toussaud golden hand from our hotel room!)

Monday, February 14, 2011
Portlandia: Put A Bird On It
I've seen this video in a couple of different places now. Hilarious.
Even for someone who has "put a bird on it" here and there and will more than likely do so again. At any given time. Without warning.
Sunday, January 16, 2011
Cupcake Liner PomPom Garland

This one - directions included - from Handmade Weddings: More than 50 Crafts to Personalize Your Big Day (through Design Sponge), is made from cupcake liners. The directions say it will take about 4 to 6 hours for 6 twelve foot strands. That sounds like plenty (and also plenty labor-intensive), but I suppose it all depends on the size of the room you need to decorate, and whether you have a crowd of willing minions to do the assembly-line folding and gluing. Right?
All I'm sayin' ... start well in advance. Especially if you're prone to searching for the perfect cupcake liners, and not being able to find them in the right design/color scheme, you decide that you can do some Japanese dyeing of plain liners (or substitute coffee filters! Cheaper! Bigger! Probably more fragile and/or too floppy, but you won't realize that until you've dyed and glued 720 of them!), and do some extra fancy scissor work or punching ... times 720 liners, times double that number if you have a big room to decorate ... times triple hours because you're doing it late at night when minions are not available ... times triple stress because you should have started three weeks earlier ...
Still, it can't be harder or more labor-intensive than the felt pompom garland I was thinking about trying a few weeks ago. After reminding myself about how much work goes into making just one felt ball and then multiplying that by a gazillion ... please. There are not enough minions in the world for such a project and I'm thinking garlands of 720 cupcake liners are a piece of cupcake.
Subscribe to:
Posts (Atom)